Thursday, January 31, 2013

Family Room Shelf

While decorating this past Christmas, I was left with three homeless stockings and stocking holders.  We don't have a fireplace at our "new" house, nor did we have any shelves high enough to prevent our then seventeen month old from pulling stockings down all. day. long.

The solution:  to build a couple of shelves to create a faux mantel

Michael cut, stained, sealed, and hung shelves from an extra piece of large plywood we had in our garage.  It was a simple and inexpensive project, but adds so much to our home!  It gives us a great place to add holiday decor and family photos.  I love having a place to put decorative breakables that Levi can't reach.

If you want to create extra shelving in your house too, all you have to do is:

-purchase pre-cut and pre-finished wood shelves (at Lowe's and Home Depot)
OR
-make them from plywood using:

a ruler
sandpaper or a sander
a saw
stain or paint
finishing product like tung oil or polyeurethane

...and hang them using:

a level
screws
brackets (I found the swirly brackets at Lowe's.)

Here is a picture of the sad, boring wall before the shelves:


 I love the color of this stain: Moorish Teak by Tzar


This is how the shelves looked with our stockings at Christmas.  Yay!!

...and here is how I'm enjoying the "mantel" now.  It will be fun to decorate it for each holiday. 

We've done quite a few updates on our first house since we moved here in May 2012.  I am excited to share them on here!  We still have a lot to do, and will be getting to work updating the kitchen and bathroom this Summer.  It's going to be a lot of work, but will be so nice to have an updated space!  I love witnessing the before and after.  

For an idea, here is how our beautiful, 70's bathroom looks now.  The walls are made of Formica and the toilet is basically hugging the vanity.  Hopefully the "after" pictures will be much different than this!  


Wednesday, January 30, 2013

Baby Preparations

This has been a crazy week.  The time for delivering our new baby boy is fast approaching, and it honestly could be any day now.  I already thought I was in labor a couple nights ago, but found out that it was "false labor".  If you've ever experienced this, you've probably also experienced the mad dash to be completely prepared to leave the house for a couple days (thinking it all has to be completely perfect and clean for some reason!). 

My eighteen month old son has no idea what is about to happen in our household.  He is so sweet, and will make a great big brother.  I can't wait to witness the first time he sees his little brother.  It will be a very special moment.  He has gathered that there is someone named Jonah in my tummy and that the ultrasound picture on his dresser is also Jonah.  That's a good start! 

My husband and I have both been very busy lately preparing for his arrival.  I am constantly cooking when I can stand on my feet long enough to do so.  We are racking up on freezer meals to make it easier on us when we have a newborn.  I didn't do this the last time (besides one batch of freezer tacos).  So, I'm excited about that!  I will be posting all of the freezer recipes I used soon...or maybe not so soon.  We'll see when labor happens!

The hospital bags are packed and ready to go as well.  For moms, this can seem like a big deal (to make sure you have everything you need and nothing you don't), but it's really not a big deal once you are at the hospital with your newborn.  It all works out.  Unfortunately, I pack like a girl scout, so it's hard for me to leave out the junk I don't really need.  I am going to also be creating a post on "what to pack for the hospital" soon, too.  I know it was helpful for me to read over several of these lists even having done it once before.

I know it will be hard to navigate through life at first with a newborn and a toddler.  Anyone have any tips?  I would love to be able to pay a good amount of attention to both boys.  Breastfeeding will take up a large deal of time, so Levi and I will have to get used to that.

I'm extremely excited to meet our son.  I can't wait to look at his little face, and to hold him.  I know how special the newborn stage is now that I see how fast they grow.

You may not hear from me on here for a bit...or I may be posting again tomorrow!  We're just waiting around for labor now :)  Oh, I'm due on Valentine's Day in case you were wondering.

I'll leave you with a few pictures of my sweet Levi as a newborn.  


Monday, January 28, 2013

Homemade Berry Fruit Snacks

Lately I've been on a cooking/nesting kick which is good for little Levi, because it means I've been trying new recipes for him, too!  I ran into this recipe for homemade fruit snacks on pinterest a while back, and it was nagging at me to be tried all the while.


It took me no time all to make them, and I actually had everything to make them on hand when I got the urge to do it.


Ingredients:
2/3 cup fresh lemon, lime, or orange juice
2/3 cup frozen or fresh organic or locally grown berries (I used frozen raspberries, blueberries, strawberries.)
1 – 2 Tbs honey
5 Tbs grass fed sourced gelatin

Directions:
1. Pour juice and berries into a small saucepan. Heat over medium heat, stirring occasionally until berries become tender and begin to soften.
2. Add honey and stir until completely incorporated.
3. Puree mixture using a immersion blender or small blender (The magic bullet worked great.)
4. Let sit, off heat, for 5 – 10 minutes.
5. Slowly whisk in gelatin, one tablespoon at a time. Whisk vigorously until completely incorporated, mixing the gelatin in very gradually to avoid lumps. (If you do get lumps, just run the mixture through your blender again.)
6. Pour into a 8 x 8 or 9 x 9 glass or metal dish. Refrigerate until set (30 minutes to an hour). Cut in small squares, or you can use cute cookie cutters.  I went with hearts for Valentine's Day.

I used the recipe I found here on thankyourbody.com.


 heating the berries with the honey and lemon juice


I used a metal cake pan.

 The mixture just came right out of the pan after I cut the edges.  I was afraid it would stick.

 cutting out hearts and flowers

 Here are all the scraps I cut up after using the cookie cutters. 


These taste really good, and Levi loves them.  It's hard for me to resist eating them all!  I think it would be fun to try some different flavors like pineapple or pomegranate.  

Saturday, January 26, 2013

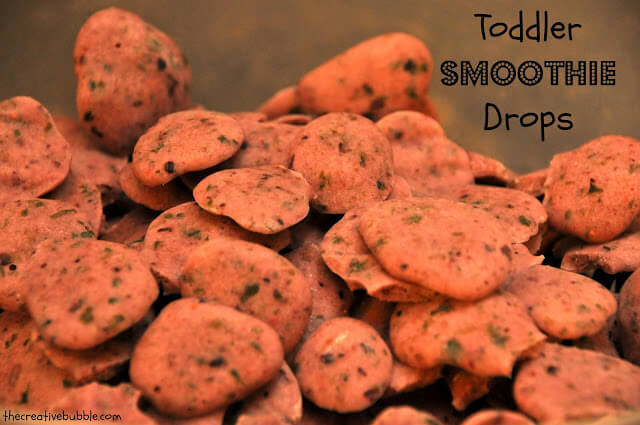
Toddler Smoothie Drops

It took a while for my one year old to get the hang of drinking a thick smoothie, and I wished there was a way to get him to have all the benefits of a smoothie "toddler style" (with his hands!) for a while before he was able to drink them. 

I finally figured out that I could freeze little smoothie drops and he loves them!  They also help alleviate his teething pain.  He just picks them up and eats them for dessert, a snack, or an add on to our breakfast menu.  It feels so good to know that he is getting his GREENS!  He is typically pretty picky with vegetables, and usually makes a face like he's being tortured if anything visibly healthy enters his mouth.  Not with these :)


Tuesday, January 22, 2013

Chocolate Almonds w/Sea Salt & Turbinado Sugar

Please welcome my sister, Carrie, this week! 

She is sharing her own recipe for dark chocolate cocoa almonds with sea salt and turbinado sugar.  She lives in Franklin, TN with her husband and two dogs.  I love her recipes and her great sense of humor. Enjoy!


Dark Chocolate Cocoa Almonds with Sea Salt and Turbinado Sugar


If you like dark chocolate and almonds, this recipe is for you! I was inspired by something similar I got at Trader Joe's. You only need a few things to make these magnificent nuts.

Sunday, January 20, 2013

Chalkboard Labels for File Cabinets

We have a file cabinet in our office area that needed a little TLC (and still does really!).  For now, I thought that some chalkboard labels would dress it up a bit. 

Wednesday, January 16, 2013

First French Macarons


I put it off and put it off, but finally made French macarons !  I did the basic flavor for the macaron itself, then additionally flavored them with fillings.  They were not as hard to make as I'd thought they'd be, BUT I will definitely have to try again to play around with flavors and colors.

To make these macarons, I added a little red India Tree Natural Decorating Colors, 3 bottles(red,yellow,blue)  (of course in honor of Valentine's Day approaching).  :) 

I made a dark chocolate ganache for half of the batch and a strawberry whipped buttercream for the other half. 

Saturday, January 12, 2013

Top 14 Favorite Pregnancy Items


I’m going to let you in on just how lazy I’ve been during this pregnancy.  You’ll be able to tell by this list of “top 14 favorite pregnancy items.”  Keeping up with an energetic one year old boy has made me anxious for the day when I get my energy back!  These things have helped me along the way.


1.  Comfort U Maternity Pillow-I didn’t have one of these with my first pregnancy, but am so glad that my awesome dad bought me one this time around.  It’s so great to cuddle with.  If you don’t have a pregnancy pillow, a big, soft blanket bunched up just right will do the trick.  
2.  Mother’s Special Blend Skin Toning Oil-This oil smells really good, and definitely helped prevent stretch marks last time and so far this time. 


Saturday, January 5, 2013

Interchangeable Felt Flower Wreath

Making this wreath is really fun, because there are so many options with felt colors and yarn choices!  

The best part is:  the flowers are interchangeable!!   

I love that you can change the flowers out for each season/holiday.  I can't wait to get busy making different colors to use for Spring, Summer, Fall, and Winter.  This wreath will be a staple in our home.


Here is what you will need to make the wreath and flowers:

rounded edge foam wreath ($4.47 at Hobby Lobby-It's a small one.  I couldn't find a large one anywhere.)
yarn (It took me less than half of the package shown above to wrap it.)
scissors
sewing pins
felt (for flowers and leaves)
felt glue (not shown above, but can be found at most craft stores beside the felt.)

 Directions:

I'll start with directions on wrapping the wreath first.  


Pin down one end of yarn to the side that you want to be the back. 

Wrap the wreath with the yarn until you make it back to the pin.  This part is good to do while watching your favorite show, because it can take a little while.

When you make it back to the pin, remove the pin, then repin both ends together.  Now, you're done with the wreath.  ...onto the flowers!

I bought lots of felt colors for all the different holidays/seasons. 

Cut a circle (you'll probably want different sizes).  You can draw a circle on the felt for a guide.

Starting on the outside edge, cut a semi-wavy edged spiral, leaving a small circle in the middle.

Now, begin coiling the felt from the outside edge until you reach the middle.

The small circle in the middle will serve as a base to hold the flower together.


This is where the felt glue comes in.  Put a decent amount of glue on the flower base, then try to make sure it secures the entire coil.


That's it!  You made a felt flower.  Now, you can add a little leaf and glue it on if you like. 

So pretty!  I love this easy project.  I thought they would be much harder to make than this, but it wasn't bad at all.

 The last step is pinning the flowers to the wreath.  I pinned the inside, middle of each flower.  You can see the pins in the picture above.  When you're ready to change them out, just remove the pins, (which comes out easily, and doesn't mess up the yarn base) and repin the colors you want next!  How fun!

Yep, I decorated for Valentine's Day already.  Our second baby boy is due on Valentine's Day, so I wanted to be prepared/festive before we become busy with his arrival.  I love Valentine's Day!  

Linked up to: Six Sister's Stuff

Wednesday, January 2, 2013

Hot/Cold Rice Packs

Well, Christmas is over, but I'm still posting gifts I made for people, because I was way too busy making them to post them all. 

I've been excited to get this entry up.  It was one of my favorite homemade gifts to do last month, mainly because I got to practice on the sewing machine.  I always feel so accomplished after I succeed in not destroying a sewing craft or the machine itself!

The whole process of making homemade hot/cold rice packs only took me about 2.5 hours.  It was a pretty simple project and the materials you need to do it are easy to come by.


What you will need:

scissors
fabric of choice-cut out in whatever shapes and sizes you like (two matching pieces per rice pack)
sewing machine-if you choose that route (or you can hand sew them)
thread
rice (brown or white)-I used both brown and white.
dōTERRA  essential oils of choice

doTERRA's Deep Blue blend would be incredible in these!

Deep Blue®
Soothing Blend


According to recent studies, more than half of us are sufferers of ongoing discomfort. Deep Blue® is dōTERRA®'s soothing solution to this challenge. Wintergreen, camphor, peppermint, blue tansy, blue chamomile, helichrysum and osmanthus work together to ease achy joints and sore muscles. Its effects are deep and penetrating with sustained results. Once gently rubbed into the area of discomfort, Deep Blue's cool therapeutic benefit will be felt almost immediately. For topical use only (wonderful for massages!).  Order your own bottle through the link above.  


Directions:

-Cut out the shapes you like from your fabric of choice.  (I did various square and rectangle shapes.)  Remember to cut two identical shapes per rice pack.
-Turn the fabric over so that the print touches the print, and you see the back of the fabric on both sides of each pack.  You will be sewing them inside out, then turning them, so that the seam is hidden.
-Start at one corner and sew completely around the shape, leaving about a 2-3 inch opening to turn the packs inside out. 
-Turn the packs by using a turning tool OR by pushing one corner up and pulling it out through the opening.
-If you choose to add essential oils, mix them into the rice before adding it to the bag.
-Once the packs are turned, you can then fill them about 2/3 full of rice.  Using a funnel helps.
-Now you can sew up the opening.  Be sure to keep the rice down while you sew.  You'll be able to see the seam from the small opening, but it looks just fine.  You could also sew a little zipper on in place of the opening so that the rice pack will be washable.  I used a machine for this part, but you can hand sew it as well.

I added eucalyptus and peppermint to two packs, and lavender to the another. 

Be sure that you don't use flammable fabrics such as synthetic felt, because they won't be microwavable. 

Directions for using your rice pack:
Simply microwave for 1-3 minutes (Heat in 30 second intervals, and test the heat level between each one.) or stick it in the freezer for an hour to use it as a cold pack. 

 This size makes a great neck heating/cooling pack.

 Notice that the fabric is turned inside out in the above picture, and I left a hole to turn the pack.
 after turning the pack
filling the bag with essential oil scented rice

 I filled it about 2/3 full of rice.
This is how the seam will look after you sew the hole.


...and here is the final product!


I got mastitis while I was breastfeeding Levi, and could not live without the hot rice pack I had! 

I'm not excited about being in pain and needing to use a hot pad, but I am excited about how relaxing it will be to use if and when I need one again :)